Not ready to replace your cabinets? No issues. All you got to do is try updating them a little.
And what exactly is the best way to do that? Paint them, of course!
It gets a tad bit boring to see the same cabinets over and over again, every single day of your life. To change the entire look and feel of your kitchen, just give them a makeover.
Now, it is not as easy as you think it is. Imagine painting a wall of your house, or maybe a whole room. That does not sound that hard, right?
Well, painting the cabinets takes almost twice as long and the difficulty level is up a notch. If you’re up for that challenge, then, my friend, you have come to the right place.
You can save money for yourself this way by following a few steps that we gathered just for you for your next home renovation. But first, let’s take a look at the things you will need in the cabinet-painting process.
Tools
- A permanent marker
- Some rags
- Paint (of course)
- Primer-sealer
- A tack cloth
- Rosin paper
- Plastic sheets
- Tape
- Paint tray
- Paintbrush
- Paint roller
- A sanding block
- Screwdriver or a screw gun
Steps for the Ultimate Kitchen Makeover
Here is everything you need to do in order to change the outlook of your kitchen and make your cabinets look as good as new:
1. Room Prepping
The room and cabinets need to be prepped first if you want to carry out a successful painting job. You can start off by clearing out all your stuff from the cabinets and removing stuff from your counters so that they don’t get in the way.
If there is any furniture, move it to another room to avoid any mishaps. It is important to protect the rest of your house when it’s time for kitchen cabinet repainting. For that, you can tape rosin paper on the floor as well as the countertops.
And as there is going to be dust and fumes involved, it is better to plastic sheet your windows and doorways. Let’s also not forget masking off the walls around the cabinets!
A worktable will be needed to paint doors, drawers and shelves.
2. Removing shelves, drawers and the doors
In case you mix up the cabinet doors, you can always mark them with a marker. Remove the hardware, hinges, screws, doors, and drawers and label them with a masking tape with a number along with its location so you know which one goes where.
After that, take everything you removed to your worktable and take out the pulls and hinges. Only keep what you will reuse.
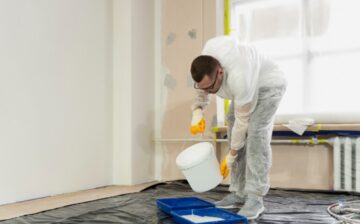
3. Cleaning the surfaces of all your cabinets
Spray and wipe your cabinets as well as its pieces with a rag. A degreasing solution would do so that the oil and grease is removed.
Once that is done, rinse the all the cabinet pieces you took out with water and make sure you let them dry before doing anything else in your kitchen.
4. Sanding
If you want to repaint your cabinets only to give them a facelift, then there is zero need to sand them. If not, then here is what you need to do:
- If you are going to use new hardware, cover the holes with a wood filler.
- Sand the doors lightly from all sides. A wood sanding block can save you from rounding over the wood edges.
- For a neat finish, it is necessary to mask off the inside of the cabinets with painter’s tape.
- If the old paint was in good condition, then there is no need take off all of the old paint. All you have to do is roughen up the surface a bit to provide a clean base for the new paint.
- Shiny areas should be sanded to avoid any previous visible finish.
- Make sure you sand those areas to the bare wood if they have old paint shredding off in pieces.
After sanding, vacuum the sanding dust and use a tack cloth to wipe down any remaining residue from the areas that have to be painted.
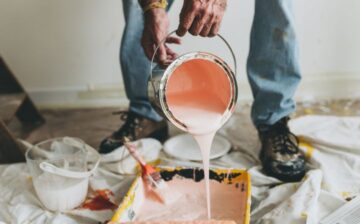
5. Applying a Primer-sealer
No, it’s not time to paint yet! But you are going to utilize your paint tray, roller and brush. Pour some primer in the tray and apply a fine coat of primer on the drawer fronts, cabinets, and doors.
The rollers can be used on large and flat surfaces while the brush can be used for the edges and some tight spots.
6. Painting
You finally get to do what you have been waiting for.
Initiate by painting the openings of the face frame and the inside edges. Then, you can move on to the outer cabinet sides and at last, the face frame fronts.
By doing this, you are working on less risky areas, so that you can see if there are any drips or smudging and then put them right.
Now, we are going to paint the drawer fronts, cabinet doors, as well as any separate wood pieces that we removed from the cabinet.
It is advisable to use a thin coat of paint while being sure that it is applied everywhere. A thin coat ensures that it is going to dry more quickly and will leave less visible brushstrokes. A thick coat means more brushstrokes and you will see more bumps when the paint dries.
Using two coats of good paint is usually enough, but a third coat would be just right as the cabinets are used every day and they also suffer from the heat and grease of the mighty kitchen.
The paint should be allowed to dry for at least 4 hours between every coat. Also, when it is dry, sand the surfaces again, lightly, for the next coat.
7. Putting it all back together
Once your last coat of paint has dried, it is time to put it all back together. Don’t forget to remove the masking tape over the cabinet doors.
You can now install the knobs and hinges and hang them in their original places.
If you want to change the whole look of your cabinets, then try using new hardware.
The End
Since you’re pretty well-educated on how to paint your kitchen cabinets, you might as well do it and enjoy the fact that you were able to paint them without investing a lot of money!
We hope you found this blog post A Step by Step Guide to Paint Your Kitchen Cabinets, useful. Be sure to check out our post Remodeling the Kitchen: Do’s and Don’ts for more great tips!

Have Experience in the Moving Industry? Want an Additional Income Stream? Work With All Around Moving!
Partner with us and we’ll help you profit. There are no recurring expenses, except purchasing your own leads. We share profits 50-50 with you from all jobs you book with us. Click here to learn more.